Shoot Better Photos

Basic Camera Functions
This page will go over the basic functions of a DSLR camera and how to use those functions when shooting photos of your work. There will also be a brief section on high quality phone cameras.
If you are unfamiliar around a camera, this page will go over the basic functions, and what you need to know when shooting pictures of pottery/small art pieces.
Shutter speed and Light meter
Shutter speed is the amount of time that your camera opens and closes its lens when taking a shot. This will be one of the main controls when adjusting your exposure (meaning how much light your camera is taking in). The slower the shutter speed, the brighter the picture. The faster the speed, the darker the image. The shutter speed control is usually located on the upper right corner of your camera as a dial.
When shooting photos of your work, using a tripod with a cable release or setting a timer on your camera is necessary. That is because your shutter speed will be slow. The slower the shutter speed, the more susceptible you are to blurry pictures. A stable tripod will ensure that doesn't happen. A shutter speed between 1/14 and 1/40 will be about right. However, it could be slower that, and as long as you are shooting on a tripod and nothing is vibrating, you can shoot with a very slow shutter speed. Anything around 1/100 or faster will most likely be too fast of an exposure.


The light meter is very simple, it tells you how light or dark your shot will be. Far left is dark, far right is bright. This is what it looks like on your cameras screen. You can also see your light meter through your camera's view finder.
Aperture or F-Stop
Your Aperture, also known as the F-stop, is how wide your lens is open to take in light. It is important to remember that a smaller aperture will give you a bigger field of focus, or depth of field, compared to a larger aperture. All cameras vary, look up your camera to find out how to adjust your F-stop.

When shooting pictures of your work you want the whole piece in focus, so you will want to use a smaller F-stop, F10 or smaller. The system is a little backwards - a bigger number = a smaller F-stop (small opening), a small number = a bigger F-stop (bigger opening).
ISO: Light Sensitivity
ISO is your cameras sensitivity to light. When shooting with all low ISO (200 or less) your camera is less sensitive to light and take less time to develop a picture. When shooting with a high ISO (1000-3200+) your camera will be more sensitive to light and takes more time to develop a picture. In other words, a higher ISO will make a picture brighter and a low ISO will make a picture darker. A higher ISO may also give the picture unwanted "grain" or "noise".

Example of a "grainy" photo
When shooting photos of your work, under studio OR natural light, your light is going to be very strong. You will want to use a lower ISO (with a smaller F-stop and slower shutter speed). If your ISO is too high, your photos will be over exposed. If they aren't overexposed with a high ISO, you might be shooting with too fast of a shutter speed, in which case your photo will come out grainy. OR your aperture may be too wide, making your field of focus limited (blurring more of the photo). Lots of things to consider!
White Balance
White Balance is the camera's adjustment to what kind of light you're shooting in. Thus, making your photo's color not too warm or not too cold. It will also make the white in the picture a more pure white. Shooting with the incorrect white balance will give your shot a blueish or redish tone. This is your camera trying to compensate for color temperature. Color temperature is measured in Kelvin (K). In a studio setting, Ideally you should be shooting with white emitting light bulbs in the 5000-8000k range.

Or, if you are shooting with natural light, the color of light will depend on the time of day. Sunrise and sunset are red to orange light. Late morning and early evening will be a warmer white/ pure white. The middle of the day will be the bluest light.

Focusing
You want to make sure that you have as much of your piece in focus as possible. There are two ways to focus your shot: using auto focus or manual focus. Auto focus, or AF, is a good way to cut down time when focusing and will ensure that you're getting a clean shot. However, it may not be the best way to focus if you are shooting a bigger piece, complicated piece, or trying to set up a composition in a natural light setting. When manually focusing, you adjust your the outer rim on your lens.

image from dummies.com
*It's important to remember that your field of focus is directly related to your F-stop. A smaller aperture will give you a bigger field of focus.*

Aperture at F3.5

Aperture at F29
Quality Options and Camera RAW
Quality options for image size is important to pay attention to. To find these options, press the menu button, and find "Image quality".
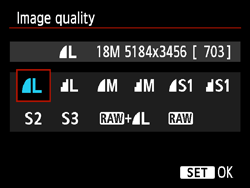
Image from products.aspx
I typically shoot in JPEG, which is L (large) or M (medium). Large-medium is a good size for image quality and viewing online. Using quality S (small) is going to be very compressed and a low quality file.
However, there is the other option, RAW. Shooting your photos with the camera RAW will give you max file size and allow you to edit before uploading into Photoshop. You can also choose to just edit in RAW. This large file type is going to capture and keep the most amount of data. This will give you the widest range of editing options and will also give the most forgiveness when editing a poorly shot photo. However, if you are shooting in RAW, you will eventually have to compress your file size to export to most locations online.
For a more detailed discussion on JPEG vs RAW click HERE
Using a High Quality Phone Camera
This section is not a 'how to' for shooting photos with a phone camera. The information below is partially opinion and partially based on data/professional advice collected. If you do not have access to a camera, but have a newer phone, this is a good option to consider.

*This photo has not been edited*
If you would have asked 5 or so years ago, shooting portfolio photos with a cell phone would have been out of the question. However, the most current phones take very high quality images with large files sizes. You are even able to see what settings your phone has selected to get a good shot; showing the same settings that you would adjust on a camera. White Balance seems to be very accurate as well.
With some of the very newest phones, you can make virtually all of the same adjustments you would be able to make on a DSLR camera. I personally do not have "the latest and greatest" phone, but even having an iPhone from 2018, I am still able to take decent photos. Plus, I'm able view the settings it chose (example of this, top right of this section) After asking a handful academics and working artists, the consensus seems pretty clear; using a phone to shoot photos is acceptable, as long as they are shot well and edited properly.
Click HERE for a step by step guide to shooting photos with an iPhone (I could not find a Samsung specific tutorial)