Shoot Better Photos

Photoshop and Editing
Post production editing will be the final step to getting your photos portfolio worthy. This step by step guide will be the 'chef's kiss' to a sharp looking portfolio.
In this tutorial, I will be going over how to edit in Adobe Photoshop. I know some prefer to use Adobe Lightroom or camera RAW for post production editing, so I have provided helpful links to help you navigate either.
Click HERE to view a video on editing in Adobe Lighroom.
Click HERE for a tutorial on Camera Raw
Uploading your Photos
After uploading your photos onto your computer, you now need to get them into photoshop. You can do this two ways. The first being opening directly in photoshop. In the upper left hand corner, Go to file>open. From there you will have to locate where you have stored your photo your computer. Once found, select open to bring into photoshop.
The second way is through Adobe Bridge. This is a good option, especially when editing many photos in batch. However, I do not use this method. For a good explanation on how to use Adobe Bridge, click HERE.
If you are opening up Photoshop for the first time, you will press "New File" and then "Create".


Setting up your Windows
Once you have the photo in Photoshop, you will need to set up your windows. Organizing your windows this way will help with accessibility and efficiency. Key windows to have on your side bar include: "Adjustments", "Properties", "Layers", and "History".
Click on "Windows" on the menu bar and you will find all of these. Click on "Adjustments", it will pop up in the middle of the screen. Then drag it over to the side bar (it will stick to the side) and then add "Properties" and "Colors" next it. Add the "History" window next to your "Layers" menu.

The benefit to having your "Adjustments" window on your side bar is that any adjustment made will open as a layer that you can manipulate.
Cropping
It is easy to over or under crop your photo. You don't want to have your pot floating in a massive void of backdrop, but you also don't want to have your pot be the only thing in frame. Your backdrop is meant to emphasize your work, so you want to have enough of it in the shot to do its job. Not showing enough of it can take away from the viewer seeing the overall profile, give a false perception of scale, or can create unfavorable focal points.

The "Crop" tool is located in the tool bar on the left side of the screen towards the top. When selected, you will have the ability to drag the edges of your photo. When finished click enter or return on your key pad. This edit will show up in your history if you wish to change the crop later.
*Side editing tip*
If your image was shot off level or looks tilted, you can fix that with the "Ruler" tool. You will have to unlock your background layer to do so. Press on the lock emblem on your background layer to unlock.

Click and hold on the "Dropper" tool and the "Ruler" tool with be in the sub tool category.
Sand blasted glaze, Joel Pisowicz, 2020

Click on the lock on your background layer to unlock it.

In this case, I clicked and dragged the ruler line from rim to rim, and then pressed 'straighten layer' at the top.
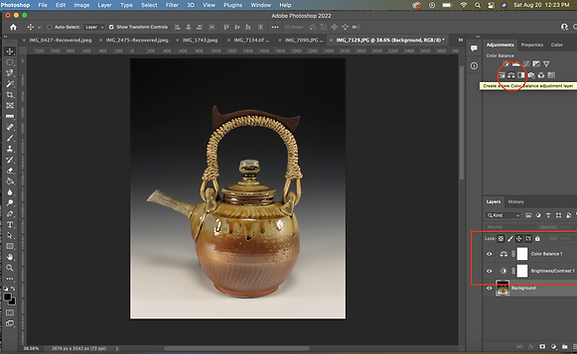
Contrast and color balance
After cropping, you want to check your contrast and color balance. This part can add a ‘romantic’ or ‘dynamic’ aspect to your photo. You don't want to over-do the contrast, but adding a hint more contrast can bring back what is lost from the photo. The key is to add just a sprinkle. You can use the ‘hide’ option (eye symbol) to turn the contrast layer off and on to see your original compared to your new contrast layer.
The correct white balanced should have been set during the production of the photos either through setting closest WB setting or using your cameras 'custom white balance'. To see how to set the custom white balance click HERE. However, things can be off sometimes. To change the color balance in Photoshop, go to the adjustments above your layers tab>color balance. From here you can adjust, and your color balance will become a layer. You may find it helpful to have a reference image, that you KNOW has the correct color, to compare to.
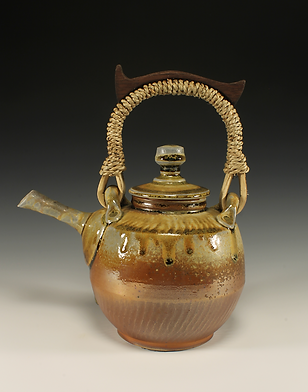
Before contrast and color balance

After contrast and Color balance
Sharpening
Sharpening is your final step. You can do this with the ‘unsharp mask’ tool. Go up to the menu bar at the top of your screen, click on filter>sharpen>unsharp mask. From the pop up screen you can adjust the value of sharpness with ‘amount, radius, and threshold’
My suggestion would be to turn your amount up way higher then you need it to be. Then, adjust your radius until the image starts to look “noisy”. Next go back and adjust your amount until the noise goes away enough, leaving a sharper image. Finally, adjust the threshold to focus the sharpness on the more important parts of the photo. For deep dive into the unsharp mask tool click HERE.


When you are done with all your tweaks and edits, go to File>Save as>desired file to save in. After you select your file, it will take you through the process of how you want your photo saved/compressed.